1. How to Create a Nighttime Color Grade
Step 1
Today, we will be adding a glow effect to the stripes, but in order to make the neon glow really pop, I want to turn this image from day to night.
This step is completely optional and will ultimately change from image to image. But for today’s image glow effect, we are starting out with a black to white Gradient Map adjustment layer with a 44% Opacity.
Step 2
Now, add a Color Lookup adjustment layer set to Night From Day, with its layer mode set to Color.
Step 3
Next, let’s duplicate the Color Lookup layer and change the layer mode to Multiply.
If your subject has eyes or any distinct highlights you’d like to keep, go ahead and mask some of this layer out over those areas. You can always come back and do this step later after you have laid down your glow effect, however. For now, I just masked out enough to make sure the eyes were still visible.
Step 4
Up next, we are going to bring back some of the highlights to keep our image from looking too flat.
Create a Curves layer, bringing the top anchor point to the left about a quarter of the way. Adjust the Curve’s Blend If settings so that it only affects the brightest points of the subject. Remember to hold Alt in order to split the Blend If toggles!
Once we are happy, we can Group the four adjustment layers we just created, naming the group “Subject’s Color Grade.”
2. How to Create a Violet Color Grade
Step 1
For the second part of this image’s color grade, we are going to create a new Group above all current and future layers. It will consist of first a Foggy Night layer set to 28% Opacity.
Step 2
Second, a Selective Color layer affecting the Cyans, Blues, Magentas, Whites, Neutrals, and Blacks.
Step 3
And finally, a Color Balance layer set to Red -13, Green -19, and Blue +27. In combination with the first color grade, this will give our image a high contrast vivid blue tone. The two color grades should be split, as in this case, we are going to sandwich our glow effect between them.
3. How to Select Colors in Photoshop
Step 1
Let’s start to prep a layer for our glow effect! First, we are going to create a New Layer between our two color grades, adding a layer mask to the layer.
Step 2
Next, we are going to temporarily hide both of our color grade groups.
To select only the black stripes of the tiger, we are going to go to Select > Color Range. Use the color dropper to select the black tiger stripes, and then set the Fuzziness to around 140. Feel free to adjust this number, keeping in mind that the white areas are the areas being selected.
Once you’re happy with the Fuzziness settings, press OK and then add a Layer Mask to the new layer. The mask will take the shape of the selection. Below, I have selected the layer mask so you can see the shape of the final layer mask.
Turn your color grade groups back on once your mask is complete!
4. How to Add a Glow Effect in Photoshop
Step 1
Finally, we can start to create a glow, beginning by adding seven different layer styles to our new layer.
First, add a Bevel and Emboss:
- Depth: 250
- Size: 21
- Soften: 8
- Angle: 60
- Altitude: 0
- Gloss Contour: Ring – Double
- Highlight Mode: Color Dodge
- Color: #dcdcdc
- Opacity: 50%
- Shadow Mode: Vivid Light
- Color: #e5e5e5
- Opacity: 10%
Step 2
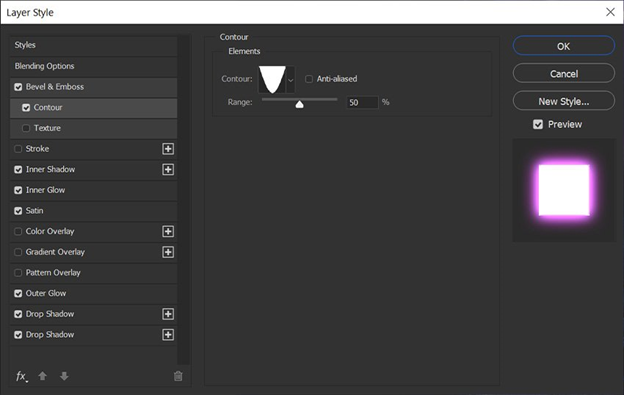
Next, add a Contour:
- Contour: Cone – Inverted
- Range: 50%

Step 3
Now, add an Inner Shadow:
- Blend Mode: Linear Light
- Color: #ebd5f3
- Opacity: 100%
- Angle: 90
- Distance: 0
- Size: 21
Step 4
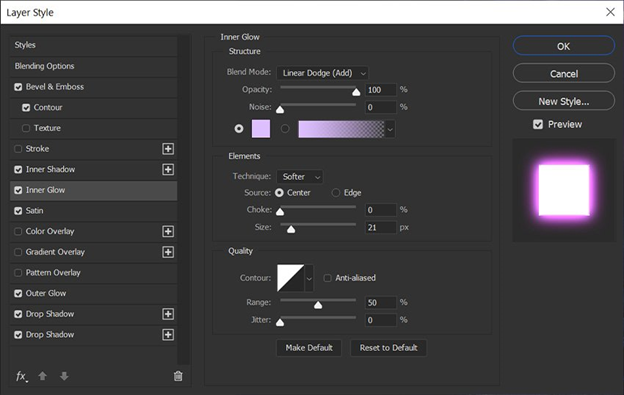
Next up, an Inner Glow:
- Blend Mode: Linear Dodge (Add)
- Opacity: 100%
- Color: #ddbfff
- Source: Center
- Size: 21

Step 5
Add a Satin layer style next:
- Blend Mode: Vivid Light
- Color: #e6a2ee
- Opacity: 50%
- Angle: 90
- Distance: 42
- Size: 146
- Contour: Linear
Step 6
Now an Outer Glow:
- Blend Mode: Linear Dodge (Add)
- Opacity: 100%
- Color: #c689ff
- Size: 63
- Range: 85%
Step 7
A Drop Shadow:
- Blend Mode: Screen
- Color: #f227ff
- Opacity: 85%
- Angle: 30
- Distance: 0
- Size: 208
Step 8
And one last Drop Shadow:
- Blend Mode: Screen
- Color: #f227ff
- Opacity: 100%
- Angle: 90
- Distance: 0
- Size: 250
Step 9
Finally, paint on your layer using a soft round white Brush! Thanks to the layer mask, the glow will only show in the darker parts of the image.
Step 10
From here, it’s just filling in the areas you’d like to glow.
You can adjust the layer mask to further refine your glowing areas. Using Brightness/Contrast to add Contrast to the mask will help define the area your glow is coming from more. On the other hand, taking away Contrast or adding Brightness will increase the glowing area.
You can also make multiple glow layers, choosing a different Fuzziness for each layer mask and then pinpointing the glow with different brushes.
Don’t worry about having to redo the layer styles—just Right-click > Copy Layer Style and then Right-click > Paste Layer Style onto your new layer.
Lower the Flow Rate of your brush to help build the glow effect up slowly. And don’t be afraid to use hard brushes for things like hair strands and eye detail.
5. How to Add a Glow Light Effect in Photoshop
Step 1
Finish everything off with a few extra boosts of glow!
First, add a layer set to Color placed above the glow style layers. Use this layer to paint a hot pink color, or whatever color your glow is, around the glowing area. Lower the layer Opacity if the effect is too strong.
Step 2
Next, add a new layer set to Screen placed above the Color layer.
Again, paint the same light neon color around the glowing areas. This layer will add more brightness and a general undefined glow.
Step 3
Lastly, add a new layer set to Overlay, placed directly below the top “Color Grade” group.
Paint white on areas you want to look extra bright and vivid. You can also adjust the Blend If settings to make the glow more defined and restricted to the lighter areas of the image, keeping the light out of the shadows.
You’re Done!
That’s all there is to making a glow effect in Photoshop! Learning how to do a glow effect has never been easier! Create glow, atmosphere, and energy with only a few layers and some preparation. Go with a classic neon pink, as we did here today, or switch it up with blues, greens, or even golds! This image glow effect is incredibly versatile and has endless uses and variations!
Video is here

