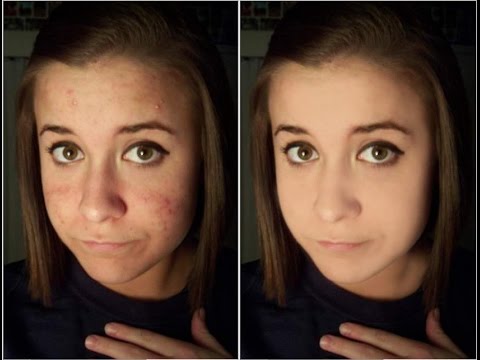
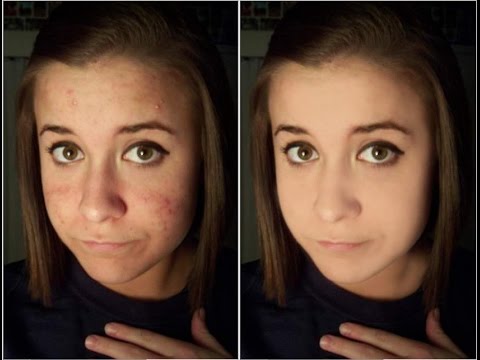
Step 1: Add A New Blank Layer
with the photo in ps on layer panel, it shows the image on the background layer
The original photo is on the Background layer.
To keep your retouching work separate from the original image, add a new layer above the image by pressing and holding the Alt (Win) / Option (Mac) key on your keyboard and clicking the Add New Layer icon:
Adding a new layer.
In the New Layer dialog box, name the layer “Spot Healing” and then click OK:
Naming the layer in the New Layer dialog box.
The new “Spot Healing” layer appears above the Background layer:
The retouching work will now be separate from the original photo.
Step 2: Select The Spot Healing Brush
Select the Spot Healing Brush
Choosing the Spot Healing Brush.
Step 3: Select The “Sample All Layers” Option
With the Spot Healing Brush selected, turn on the Sample All Layers option in the Options Bar. This lets the Spot Healing Brush sample texture not just from the currently-selected layer (the “Spot Healing” layer, which is blank), but also from the image below:
The “Sample All Layers” option.
Step 4: Select “Content-Aware”
Still in the Options Bar, make sure Type is set to Content-Aware. This allows Photoshop to make more intelligent decisions when choosing good replacement texture:
“Content-Aware” should be selected by default.
Step 5: Click On The Skin Blemishes To Heal Them
Click on pimples and other minor skin blemishes with the Spot Healing Brush to quickly heal them. For best results, keep your brush slightly larger than the blemish. To change your brush size from the keyboard, press the left bracket key ( [ ) to make the brush smaller or the right bracket key ( ] ) to make it larger.
Here, I’m positioning my brush over one of the pimples, and I’ve resized my brush so that the cursor (the black circular outline) is just a bit larger than the pimple itself:
Moving the Spot Healing Brush over a blemish.
I’ll click on the pimple with the Spot Healing Brush, and instantly, it’s gone! Photoshop replaced it with good skin texture from the surrounding area:
Clicking to remove the blemish and heal the area.
How To Fix Mistakes
If Photoshop makes a mistake and the blemish isn’t gone after the first try, undo your click by pressing Ctrl+Z (Win) / Command+Z (Mac) on your keyboard. Resize your brush if needed, and then click on the same spot to try again. Each time you click, you’ll get a different result.
I’ll continue clearing up other pimples in the area by moving my brush over them, adjusting its size with the left and right bracket keys, and clicking. Her skin is already looking better:
More pimples have been cleared up with just a few clicks of the mouse.
Retouching Larger Areas With The Spot Healing Brush
Let’s move down to her chin where we see some larger problems:
Large clusters of pimples can be a bit more of a challenge.
To clear up more difficult areas like this, tackle the easier problems first. I’ll start by clicking on the small, isolated pimples with the Spot Healing Brush to heal them and get them out of the way:
Heal small areas before moving on to larger ones.
Then, rather than trying to fix a large area all at once with a super wide brush and a single click, approach it in smaller sections, beginning from the outside and making your way inward. Along with clicking, you can also click and drag the Spot Healing Brush in short strokes. As you drag, your brush stroke will appear black:
Dragging a short brush stroke across the area.
Release your mouse button and Photoshop heals the area with surrounding texture:
Releasing the brush to let the Spot Healing Brush do its thing.
I’ll continue clicking and dragging over the area one small section at a time, going back over any problem spots as needed with additional clicks. After a short few minutes worth of effort, the Spot Healing Brush did a pretty good job:
The area on the right is now looking a lot better.
I’ll do the same thing for the area on the other side of her chin, using a small brush and a series of clicks and short brush strokes to tackle the area a little at a time. And here’s the result:
Her chin is now pimple-free thanks to the Spot Healing Brush.
Clearing Up The Remaining Blemishes
There’s one cluster of pimples remaining, and it’s directly under her nose:
A few more pimples left to remove.
Once again, I’ll start by clicking on the smaller, isolated pimples to heal them, keeping my brush just slightly larger than the pimple itself:
Healing the smaller areas first.
Then I’ll use a combination of clicking and dragging with a small brush to heal the remaining area:
Clearing up the last of the pimples.
The area is now pimple-free, with healthy skin texture in its place:
The remaining blemishes have been removed.
The Spot Healing Brush Blend Modes
When retouching skin with the Spot Healing Brush, you’ll often get better results by changing the blend mode of the brush from Normal (the default setting) to Lighten. The Blend Mode option is found in the Options Bar:
The Blend Mode option for the Spot Healing Brush.
With the blend mode set to Lighten, Photoshop will only replace pixels that are darker than the good texture. Since pimples and other skin blemishes are usually darker than normal skin tone, only the pimple or blemish itself gets replaced, leaving more of the original skin texture surrounding it intact. If a blemish is lighter than the normal skin tone, try the Darken mode instead.
To quickly switch between blend modes for the Spot Healing Brush, press and hold the Shift key on your keyboard and press the + or – keys.
Before And After Comparison
To compare your retouching work with the original image, toggle the “Spot Healing” layer on and off by clicking its visibility icon in the Layers panel:
The visibility icon for the “Spot Healing” layer.
Click it once to turn the “Spot Healing” layer off and view the original, unedited version:
The original image.
Click it again to turn the “Spot Healing” layer back on and view your image with the skin blemishes removed:
The final result.

And there we have it! That’s how to remove acne and other minor skin blemishes with the Spot Healing Brush in Photoshop! Now that you know how the Spot Healing Brush works, take your skills to the next level.

