Step 1: Setting up the Background
Open a new document in Photoshop that is 1900px by 1200px. Fill the background with black by going to Edit -> Fill -> Use: Black.
Step 2: Adding your text

Add whatever text you want to add the neon effect to to the stage. I used Verdana Bold 200px to write the word ‘Pixellogo’. I also made my text green (#68a62a). Rasterize this text layer by going to Layer -> Rasterize -> Type. Duplicate this layer so that you have two different rasterized text layers to work with.
Step 3: Adding a Gaussian Blur
Select your first, bottom rasterized text layer. Go to Filter -> Blur -> Gaussian Blur and use a radius of 5.5px.
Step 4: Setting the Layer Styles
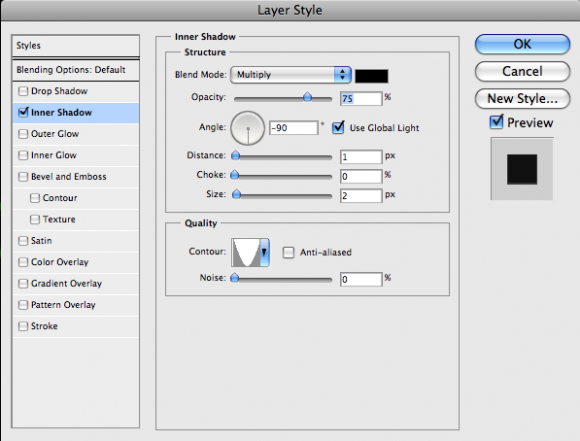
Now, select the other, top rasterized text layer. Go to Layer -> Group Layers so that this layer is placed inside of a folder. Change the blending mode for the folder to Colour Dodge. Select the rasterized text layer inside this folder and go to Layer -> Layer Style -> Inner Shadow. Set the Blend Mode to Multiply and use Black. Set the Opacity to 75%, Angle to -90, Distance to 1px and Size to 2px. Set the Contour to the Cone-Inverted preset. Your settings should look like this:
Now, switch to the layer style Outer Glow. Set the blend mode to Colour Dodge, Opacity to 50%, Noise to 0% and choose white as your colour. Your settings should look like this:
Finally, you need to add a blur to this layer. Go to Filter -> Blur -> Gaussian Blur and set the radius to 2.0px.
Step 5: Adding a Blur behind the Type
Select the folder as well as both of the type layers. Go to Layer -> Duplicate Layers… Merge these new duplicate layers by going to Layer -> Merge Layers while they are still selected. With the new merge layer still selected, go to Filter -> Blur -> Gaussian Blur and set the radius to 100px. Move this layer so that it is above your black background and below the rest of your neon type.
Step 6: Adding Clouds to the Backgound
Create a new layer. Reset your colours to Black and White. Go to Filter ->Render-> Clouds. You will get something like this:
Set this layers blending mode to Soft Light and its Opacity to 30%. This just adds a little texture to your design.
Step 7: Adding Depth
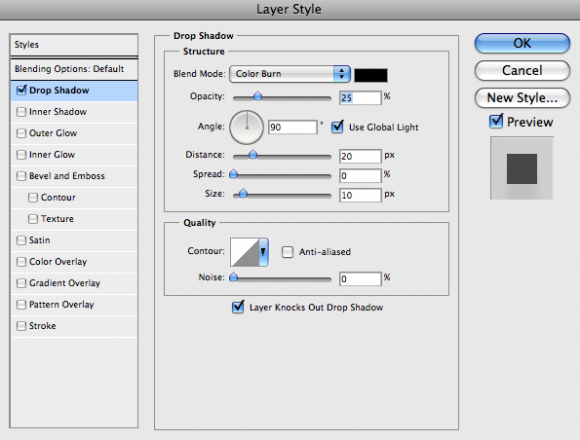
Select again the first rasterized text layer and go to Layer -> Layer Style -> Drop Shadow.Set the Blend Mode to Colour Burn, use Black as your colour, set Opacity to 25%, the Angle to 90, Distance to 20px and the Size to 10px.
The added Drop Shadow effect adds more depth to your design. You should have something like this:

Step 8: Adding more Texture
Now, I just want to add a little rain drop effect to the background. For this step, I used one of the rain drop wallpapers. Simply add the texture to your design and set the Blend Mode to Screen and the Opacity to 30% and you’re done!

