Best to use when: you’re doing it for you, you need it fast, and you’re not necessarily looking for perfection. Best to use with high contrast between subject and background, and when the subject has fairly simplistic lines.
By far the quickest method discussed here is the built-in Photoshop Quick Action for removing backgrounds in Photoshop. This is new in Photoshop 2021 (in the Creative Cloud subscription) and provides a very fast way to remove backgrounds.
With speed, however, comes less accuracy. Using Photoshop Quick Action will do most of the work for you, but the results may fall short of your expectations, depending on your image. If that’s the case, you can use any of the methods described here to polish up the result.
Steps:
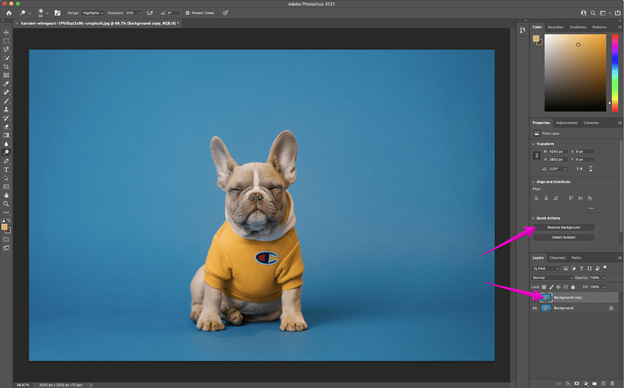
- With your image open in Photoshop, right click your Background layer and click Duplicate Layer. In the dialog box that pops up, name your layer (whatever you’d like), and click OK. Click the eye icon to the left of the original layer to turn that layer off.
- Make sure your Properties panel is open by going to Window > Properties. (If it was already checked, there’s no need to click it; if it isn’t checked, click it to open it up on the right-hand side by default.)
- In your Layers panel, click your new layer. In the Properties panel (by default this should be above your Layers panel), click the Remove Background button under Quick Action.
- The quick action has now removed the background, leaving your layer with a mask around the subject.

From here, you can make refinements by going into the mask and adjusting as needed (such as around the dog’s feet at the bottom left of the image). While outside the scope of this article, if you need help with working with masks

